Most people sign checks without thinking twice — until something goes wrong. A misplaced signature, a missing endorsement, or the wrong wording can get your deposit rejected or, worse, leave you exposed to fraud. This guide covers exactly how to sign a check in every common situation: as the payer, as the recipient, for mobile deposit, and when signing it over to someone else. No fluff — just what the bank actually needs.
Key Takeaways
- Sign the front of a check as the payer (bottom-right signature line)
- Sign the back of a check as the recipient (endorsement area only)
- Add “For deposit only” to reduce fraud risk significantly
- Mobile deposits often require specific endorsement wording — check your bank’s app first
- Signing a check over to a third party works, but many banks won’t accept it
Part 1: How to Fill Out a Check Before You Sign It
Before your signature goes anywhere, every field needs to be correct. A missing or inconsistent detail can delay processing or bounce the payment entirely.
The 6 Fields on the Front of a Check
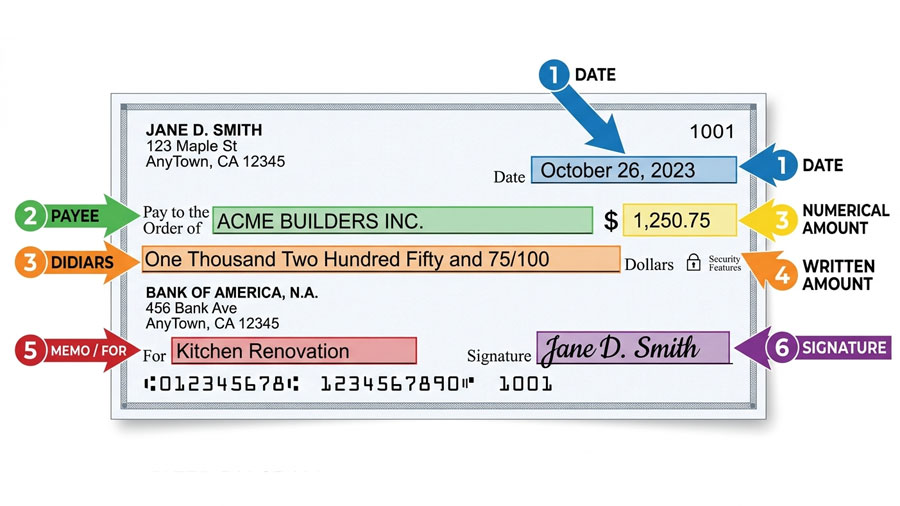
Here’s what each field requires:
| Field | What to Write | Common Mistake |
|---|---|---|
| Date | Today’s date (or a future date if post-dating) | Leaving it blank |
| Pay to the Order of | Full legal name of the recipient | Nicknames or abbreviations |
| Amount (numbers) | Dollar amount in the box (e.g., $425.00) | Skipping the cents |
| Amount (words) | Written amount on the line (e.g., Four hundred twenty-five and 00/100) | Mismatch with numeric amount |
| Memo | Optional note (e.g., “Rent – June 2026”) | Putting sensitive info here |
| Signature | Your signature matching your bank’s records | Signing before filling out the amount |
If the written and numeric amounts don’t match, most banks default to the written version. Always double-check both.
CFPB’s official guidance on how checks are processed
One Rule: Sign Last
Never sign a blank check. Once your signature is on it, the check is legally negotiable — even with no amount written in. Fill out every field first, then sign.
Part 2: How to Sign a Check as the Payer
Signing the front of a check is straightforward, but a few details matter more than most people realize.
Where Your Signature Goes
Your signature belongs on the bottom-right line on the front of the check. That line is typically labeled “Signature” or left blank with a line. It must match the signature your bank has on file — the one you provided when you opened the account.
A signature that looks significantly different may trigger a fraud review and delay the payment.
Can You Use a Stamp or Printed Signature?
For personal checks: no. For business checks: sometimes. Many businesses use signature stamps for high-volume check writing. Under UCC § 3-401, any symbol adopted with the intent to authenticate qualifies as a valid signature — but your bank’s internal policy may be stricter. If you run a business and want to use a stamp, confirm with your bank first.
Part 3: How to Endorse a Check — Signing the Back
When you receive a check, signing the back is called an endorsement. It authorizes the bank to process the payment on your behalf.
Where to Sign on the Back
Look for the endorsement area — usually a 1.5-inch section at one end of the check, marked with lines and the text “Do not write, stamp, or sign below this line.” Keep everything inside that zone. Anything outside it can interfere with the bank’s processing equipment.
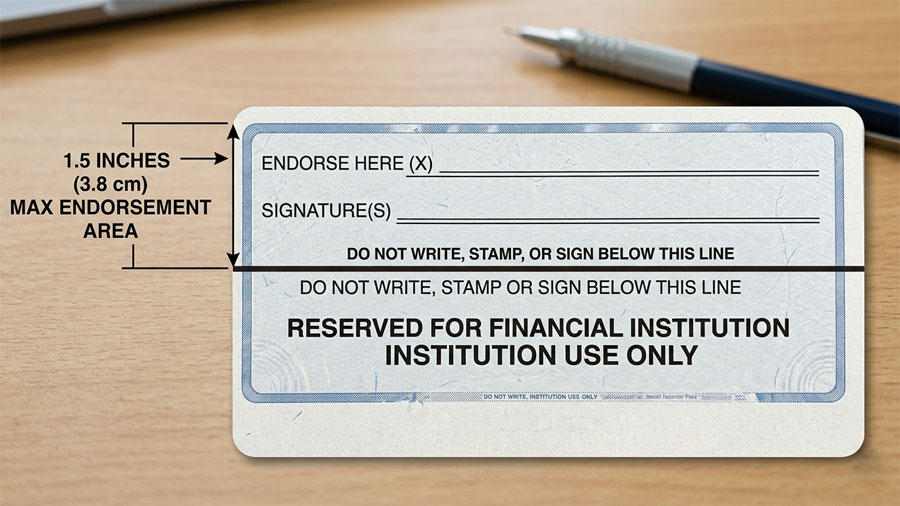
The 4 Types of Check Endorsements
| Type | What to Write | Security Level | Best For |
|---|---|---|---|
| Blank Endorsement | Your signature only | 🔴 Low | Cashing in person immediately |
| Restrictive Endorsement | “For deposit only to acct #XXXX” + signature | 🟢 High | ATM, mail, or unattended deposit |
| Special Endorsement | “Pay to the order of [Full Name]” + signature | 🟡 Medium | Signing a check over to someone else |
| Conditional Endorsement | Custom condition + signature | 🟢 High | Specific business transactions |
The safest default: always use a restrictive endorsement unless you’re cashing the check in person right now.
What If Your Name Is Spelled Wrong?
First, sign it with the misspelled version — exactly as it appears on the front. Then sign again below with your correct legal name. This tells the bank both signatures belong to the same person. If the error is significant, contact the check writer for a replacement.
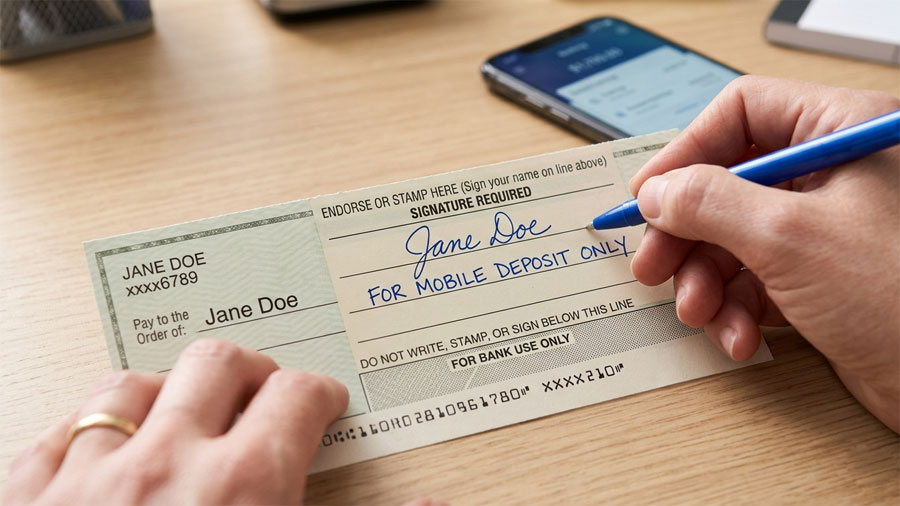
Part 4: How to Sign a Check for Mobile Deposit
Mobile deposit has its own rules — and ignoring them is the fastest way to get a deposit rejected.
Why Banks Require Special Endorsement Wording
When you deposit a check via your phone, the bank can’t physically review it. To reduce double-deposit fraud (someone depositing the same check twice), most major banks require you to write “For Mobile Deposit Only” under your signature.
Major Bank Requirements at a Glance
| Bank | Required Endorsement | Consequence If Missing |
|---|---|---|
| Chase | Signature + “For mobile deposit only” | Deposit may be rejected |
| Bank of America | Signature + mobile deposit checkbox in app | Processing delay possible |
| Wells Fargo | Signature + “For mobile deposit only” | Deposit rejected |
| Citibank | Signature (no additional text required) | No consequence |
| Most Credit Unions | Varies — check with your branch | Possible rejection |
Policy details sourced from each bank’s official Help Center. Confirm current requirements in your bank’s app before depositing.
Step-by-Step: Mobile Check Deposit Endorsement
- Open your bank’s mobile app and start a new deposit — before you sign anything
- Check the app’s instructions for required endorsement wording
- Sign your name in the endorsement area on the back of the check
- Write “For Mobile Deposit Only” (or whatever your bank specifies) directly below your signature
- Take the photo using even lighting, a dark background, and a steady hand
- Hold onto the physical check for at least 14 days after the deposit confirms — in case of any processing issues
Part 5: How to Sign a Check Over to Someone Else
This is called a special endorsement or a third-party check — and it works in theory, but comes with real limitations.
How to Do It
- Write “Pay to the order of [Full Legal Name]” in the endorsement area
- Sign your name below that line
- Have the new payee confirm their bank will accept a third-party check before anyone deposits it
Explore the best checking accounts that support third-party deposits
The Catch Most People Don’t Know
Many banks — including several major ones — quietly refuse third-party checks because they’re commonly used in fraud schemes. Neither the original payer’s bank nor the deposit bank is required to accept them.
Before you try this: call the bank where the check will be deposited. Ask directly: “Do you accept third-party endorsed checks?” If they say no, the check writer will need to issue a new one.
Part 6: Special Signing Situations
Checks Made Out to Two People
The word between the names is everything:
- “John Smith AND Jane Doe” → Both people must endorse the check
- “John Smith OR Jane Doe” → Either person can endorse it alone
This distinction comes from UCC Article 3. Banks take it seriously. If a check says “and” and only one person signs, the bank can — and often will — reject the deposit.
Signing a Check on Behalf of a Business
The check is payable to the business, not to you personally. Endorse it as:
[Business Name] By: [Your Signature] [Your Title]
Only individuals authorized to handle company funds should sign business checks. If there’s any ambiguity about who’s authorized, the bank may place a hold.
Checks for Minors or Deceased Individuals
A parent or legal guardian may endorse a check on behalf of a minor. For a deceased person, the estate’s executor handles endorsement. In both cases, contact the bank before depositing — they’ll usually want to verify authorization.
Check Fraud: What You Need to Know in 2026
Check fraud has surged in recent years. According to the American Bankers Association, check fraud losses in the U.S. exceeded $26 billion annually in recent reports — with “check washing” (chemically erasing ink and rewriting checks) among the most common tactics.
Five habits that protect you:
- Use a gel pen — the ink is harder to wash out than ballpoint
- Never leave dollar amount fields blank with extra space — draw a line through unused space
- Endorse checks only when you’re ready to deposit — not days in advance
- Mail checks in security envelopes if sending by post
- Monitor your account for unexpected withdrawals within 30 days of writing a check
ABA’s annual check fraud statistics and prevention resources
Frequently Asked Questions
Can I deposit a check without signing the back?
Some banks accept unendorsed checks for small amounts deposited into a matching account. But if any issue comes up weeks later, the bank can reverse the deposit. Endorsing properly protects you.
What happens if I sign a check in the wrong place?
If your signature falls outside the designated endorsement area, processing equipment may miss it and the bank may reject the deposit. Sign only within the marked 1.5-inch zone.
How long is a signed check valid?
Most personal checks are valid for 180 days (6 months) from the date written. After that, banks can refuse to process them — though some may still accept them at their discretion.
Is it legal to sign a check for someone else?
Only with explicit written authorization (a power of attorney or similar document). Signing someone else’s name without authorization — even with their verbal permission — can constitute check fraud under state law.
The Bottom Line
Signing a check correctly takes less than 60 seconds — but doing it wrong can cost you time, money, and a fraud headache you didn’t see coming. Match names, sign in the right zone, use a restrictive endorsement whenever possible, and always check your bank’s mobile deposit requirements before hitting “submit.” When in doubt, call your bank directly. That one phone call is always faster than untangling a rejected deposit.
Disclaimer: The information in this article is for general educational purposes only and does not constitute financial, legal, or banking advice. Check processing policies vary by financial institution and are subject to change. Consult a licensed financial professional or your bank directly for guidance specific to your situation.